Using the WordPress REST API & Gatsby.js to build a static website


We ran a Workshop at WordCamp Brighton 2018 about how to use the WordPress REST API and Gatsby.js to build a static website.
Objective of this Workshop
- Introduce Gatsby.js and the benefits of a headless approach
- Discuss some of the pitfalls and challenges of this approach
- Show you how to use Gatsby.js to build a simple website using our example and the WordPress REST API
Requirements
- A laptop
- An internet connection
- Development environment that supports:
- Node (v6 onwards)
- NPM (v3 onwards)
- GIT
- Basic development experience
- Nice to have:
- Experience with JS, React, GraphQL & Static Site Generators
- Familiarity with Terminal/CLI
Introduction to Gatsby.js and Examples
WordPress is great for document based websites:
- HTML, CSS, JS
- Does not include native asset pipelining
- Refresh to view changes
- Full page reloads
- php and mySQL

Gatsby.js creates app-like experiences:
- Includes code splitting, responsive images, etc
- Virtual DOM & declarative user interface with React
- Componentis
- Hot reloading
- ES6 + ES7 automatically transpiled
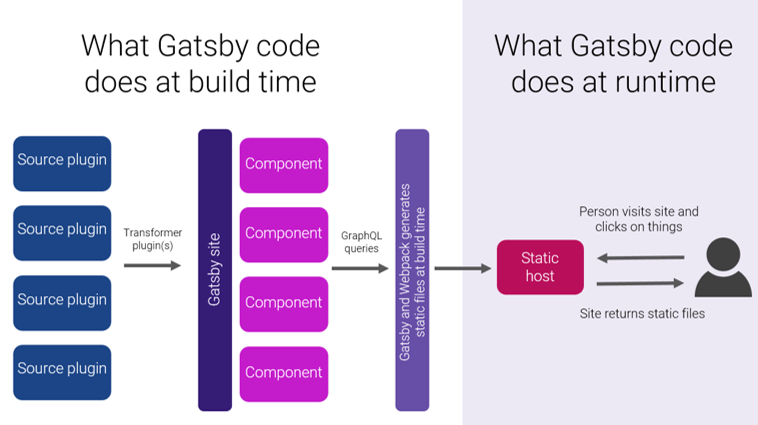
One of the main benefits of Gatsby.js is the performance that can be achieved:
- Offline & caching makes it great for users even on 3G
- Initial call loads the website and critical elements are inlined
- Predicts likely pages to be visited and prefetches them in the background making link clicks instantaneous
Gatsby.js is data and CMS agnostic so data can be pulled into the website from multiple sources using GraphQL and React.
We use Netlify for hosting making website deployment easy and free..
- Content delivery network
- Global load balancing
- Server redundancy and failover
- Continuous deployment and integration
Our Workshop Example
You will build wcbtn2018.indigotree.co.uk

This uses a WordPress install gatsbyworkshop.wpengine.com for the page and post data, with the following plugins:
- Advanced Custom Fields
- ACF to rest API
- Yoast
- Our Gatsby Workshop plugin github.com/indigotree/gatsbyworkshop-wc2018-wp-plugin
Pitfalls of this Approach
- What used to work in WordPress does not work any more, for example form plugins will not work
- Gives the developer more flexibility but you will need to do more work yourself
Gutenberg should not make any difference; we can add individual blocks into the rest API but there is nothing currently in Gatsby that understands blocks.
Challenges
Site Preview: Not instant, takes a few seconds to generate the site
Images: Featured images are pulled in and stored on the Gatsby site, lazy loading works BUT other images within page content are pulled from the WordPress site. We recommend Cloudinary for image hosting
Forms: We often use Netlify forms or you can write a Lambda function
Comments: Use a third-party like Disqus or write a Lambda function
Build Your Website
Full instructions are here: github.com/indigotree/gatsbyworkshop-wc2018-starter/
0. Installation/Setup
a. Install Node JS (recommended v8.11 LTS)
If you already have Node JS, you can skip this step.
You can download & install Node JS from here: nodejs.org/en/
b. Install GIT
If you’re on Mac, GIT should already be available through xcode tools, and if you’re in Windows, you can download it from here: git-scm.com/
c. Install Gatsby CLI
$ npm install --global gatsby-cli
If you have problems installing packages globally, then consider one of these approaches: docs.npmjs.com/getting-started/fixing-npm-permissions
d. Create your Gatsby Site
$ cd ~/Desktop
$ gatsby new wcbtn-gatsby https://github.com/indigotree/gatsbyworkshop-wc2018-starter.git
$ cd ./wcbtn-gatsby
$ gatsby develop
This will download roughly 275mb of JS packages into your Gatsby directory.
If all goes well, you should have a development server running Gatsby, which you can view by visiting http://localhost:8000
1. Query GraphQL for all WordPress pages
Gatsby doesn’t create pages automatically, we need to query all of our WordPress pages and create physical pages for them.
We first need to query for the WordPress pages. Add this within gatsby-node.js to define the query.
const queryWordPressPages = `
  {
    allWordpressPage (filter: { status: { eq : "publish" } }) {
      edges {
        node {
          id
          wordpress_id
          slug
          template
        }
      }
    }
  }
`
2. Run the GraphQL query, and loop through the results
Still inside gatsby-node.js, we need to run the GraphQL query, which will return back all of the pages that matched our query. Here we can loop over those pages ready for step 3 where we create the Gatsby pages.
return graphql(queryWordPressPages).then(r => {
    if (r.errors) {
        console.log(r.errors);
        reject(r.errors);
    }
    _.each(r.data.allWordpressPage.edges, edge => {
        // step 3. add the createPage function here
    });
})
.then(r => {
    resolve();
});
3. Create pages with Gatsby
We can use the createPage function from Gatsby to create physical pages on our site. This code can be added within the loop that we wrote in step 2.
createPage({
    path: edge.node.wordpress_id === config.front_page ? '/' : edge.node.slug,
    component: slash(path.resolve(`./src/templates/page.js`)),
    context: {
        id: edge.node.id,
        wordpress_id: edge.node.wordpress_id
    }
});
4. Create the page.js page template
Every page created by createPage() needs to have a template. Let’s start by adding an empty template to output the page title & content. Create a file at src/templates/page.js and add the following code:
import React, { Component } from 'react';

export default class PageTemplate extends Component {
    render() {
        return (
            <div>
                <h1>{this.props.data.page.title}</h1>
                <div dangerouslySetInnerHTML={{ __html: this.props.data.page.content }} />
            </div>
        );
    }
}

export const query = graphql`
    query currentPage($id: String!) {
        page: wordpressPage(id: { eq: $id }) {
            title
            content
        }
    }
`
5. Re-run the gatsby-develop command
As we have now made changes with how Gatsby handles the WordPress content. We need to re run the gatsby develop command. You will first need to cancel the current process with CTRL + C and then run gatsby develop.
View by visiting http://localhost:8000
6. Check Gatsby has created the pages
This should create a Gatsby page for each of our WordPress pages. If you visit http://localhost:8000/nope, which is the Gatsby dev 404 page, you should be able to see a list of all pages created by Gatbsy.
Try to visit one of the pages Gatsby has created for us, such as http://localhost:8000/about where we should see our title & content from WordPress.
7. Improving our page.js template
Update our src/templates/page.js template to include the following code:
import React, { Component } from 'react';

import BaseLayout from '../components/Layouts/BaseLayout';

export default class PageTemplate extends Component {
    render() {
        const { page, config } = this.props.data;
        return (
            <BaseLayout config={config} hero={{ image: page.hero, title: page.title }}>
                <div dangerouslySetInnerHTML={{ __html: page.content }} />
            </BaseLayout>
        );
    }
}

export const query = graphql`
    query currentPage($id: String!) {
        page: wordpressPage(id: { eq: $id }) {
            title
            content
            hero: featured_media {
                ...HeroImage
            }
        }
        config: wordpressGatsbyConfig {
            name
            description
        }
    }
`
8. Tell Gatsby to use our homepage template
During step 3, in gatsby-node.js, we told Gatsby to create all pages using our page.js template. But as we would like our homepage to use a different template, we can add a check to see which page is being created and provide Gatsby with the correct template to use.
Inside gatsby-node.js, find the createPage() code that we added previously, and update the component with:
component: (
  () => {
      if (edge.node.wordpress_id === config.front_page) {
          return slash(path.resolve(`./src/templates/home.js`));
      }
      return slash(path.resolve(`./src/templates/page.js`));
  }
)(),
Next, we need to remove the temporary homepage that you can find at src/pages/index.js. Simply delete this file.
9. Re-run the gatsby-develop command
As we have now made changes with how Gatsby handles the WordPress content. We need to re run the gatsby develop command like we did in step 5.
View by visiting http://localhost:8000
10. Next Steps
Add the posts and archive:
- We have added news articles in the WordPress site
- We have added react components in our code
So you will need to:
- Setup your Gatsby templates
- Pull in articles through gatsby-node.js
The commit which contains all of the code for the news/articles is github.com/indigotree/gatsbyworkshop-wc2018/commit/15189a701d4a48b41f6477c29b0d2c96e701bc85
Hosting
We recommend Netlify www.netlify.com/
- Push up code to your Git repo
- Sign up to Netlify app.netlify.com/signup
- Connect Netlify with your Git Repo
Useful Links
The demo website …
wcbtn2018.indigotree.co.uk
The code for the entire demo website …
github.com/indigotree/gatsbyworkshop-wc2018
The starter repo for the workshop …
github.com/indigotree/gatsbyworkshop-wc2018-starter
The completed code for the workshop …
github.com/indigotree/gatsbyworkshop-wc2018-complete
The commit which contains all of the workshop code we’re asking you to add …
github.com/indigotree/gatsbyworkshop-wc2018/commit/12ea9c2d5c343c29460dbcc5d430c9f3ae681105
The commit which contains all of the code for the news/articles …
github.com/indigotree/gatsbyworkshop-wc2018/commit/15189a701d4a48b41f6477c29b0d2c96e701bc85
WordPress plugin…
github.com/indigotree/gatsbyworkshop-wc2018-wp-plugin
Gatsby.js documentation
gatsbyjs.org
Leave A Comment
Hello,
Great tutorial, just one thing, the ‘config.front_page’ part in gatsby-node.js, where did you define this? I’ve tried figuring out a native/dynamic way of creating the home page with a root level path and this seems perfect, just not sure how you’ve dynamically checked if it’s a homepage.
Any response would be brill
Thanks
Hi Baillie,
This was added to the WordPress REST API.
You can find the code for that here: github.com/indigotree/gatsbyworkshop-wc2018-wp-plugin/blob/master/src/api.php
This plugin contains all of the server side code that we wrote for the workshop: github.com/indigotree/gatsbyworkshop-wc2018-wp-plugin